How-to Easily Upgrade XAMPP on Windows
I will like to share a quick and easy steps of upgrading XAMPP on Windows. In the past, the usual steps are to move the \htdocs files and the MySQL files located in “DRIVE:\xampp\mysql\data‘ to the new XAMPP directory and whala you are done. Most time, this database migration process has not really worked for me and it’s often the main reason I don’t like upgrading my XAMPP. Alternatively, I usually do a backup of each database and import them to the new server; that was definitely a hard and boring work I must say.
To begin “How-to Easily Upgrade XAMPP on Windows” process;
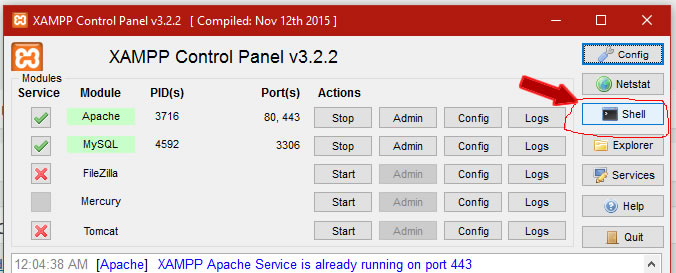
Let’s open XAMPP Control Panel as an Administrator by right-clicking on the icon and select “Run as administrator”. When you have the XAMPP CP visible, click on SHELL (top right)

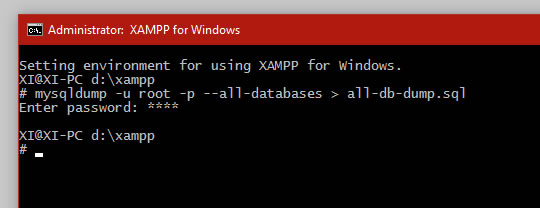
Input (or copy and paste) this command and press enter
mysqldump -u root -p --all-databases > all-db-dump.sql
If you have a different user for your database other than ‘root’, then make sure you use the appropriate one. You will be asked to provide your database password; enter the current password(or just press enter if your DB has no password) and let the Shell do the magic.

The process might take awhile and that depends on the size of your database. Upon completion, the SHELL would have created a file named “all-db-dump.sql” in your “DRIVE:\xampp\’ directory. This file contains all your databases.
Now, your database backup process is done, you can close the Shell now.
STOP all XAMPP services (Apache, MySQL/MariaDB, Tomcat e.t.c) and quit the control panel as well.
Furthermore, rename this XAMPP folder to something like XAMPP-[version] or XAMPP-old and install/extract the new XAMPP to the same location as “DRIVE:\xampp’. Copy your htdocs folder from the XAMPP-old(or whatever name you gave it) to the new XAMPP directory.
Now, run the control panel of this new XAMPP, as an administrator, from it folder. Start all necessary XAMPP services from the control panel to proceed.
Make sure everything is working perfectly the way it should including phpMyAdmin.
Open “DRIVE:\xampp\php\php.ini‘ in your editor and change these configs: upload_max_filesize, memory_limit, post_max_size, max_execution_time (you can use Ctrl+F to find the variables in your editor)
Set the value of the variables to something very high (depends on your all-db-dump.sql file size though) so the DB file upload can work on the server.
Note that post_max_size and memory_limit need to be large enough; if possible, larger than upload_max_filesize. Try and make max_execution_time=10000 or more.
Open ‘DRIVE:\xampp\phpMyAdmin\libraries\config.default.php‘ in your editor as well and look for $cfg[‘ExecTimeLimit’] = 600;
Change the variable value to something higher than 8000(also depends on what you all-db-dump.sql file size is) or more.
Now, start all necessary XAMPP services (Apache & MySQL), then go to phpMyAdmin and login(if need be).
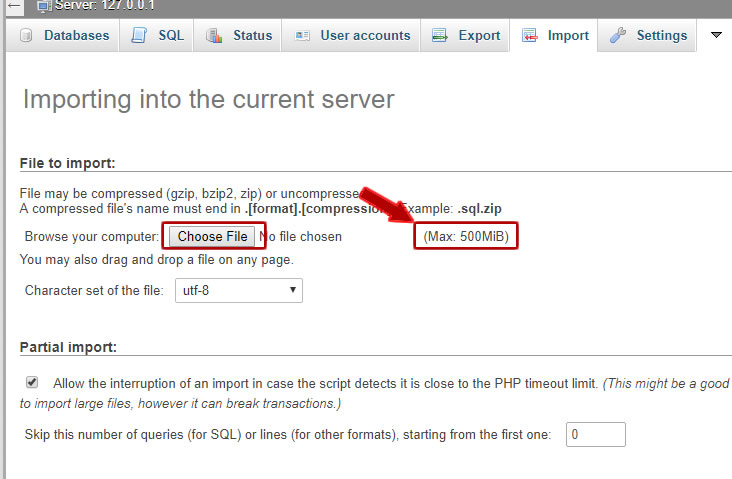
Click on import tab and choose the file to import; in this case, our “all-db-dump.sql” in the old XAMPP directory. Then click ‘GO’ with the default import options.
Make sure your “all-db-dump.sql” file size is NOT larger than the Max file size(upload_max_filesize)
This process might take some time, depending on the number of database in the “all-db-dump.sql” file.

If everything work as expected, you should see a successfully import message and you should have all your databases in the new XAMPP without error.
Also, check if the sites and working properly and db connectivity is smooth.
If all is well and okay, then delete or backup your XAMPP-old directory.
Whala!!! We are done upgrading.
You might also enjoy reading this: Multiple PHP version with XAMPP on Windows
If you have any contribution or question, please SAY SOMETHING below. Thanks.


This solution doesn’t help in my case but then I found a solution on WPblog which helped me to upgrade my php version. Here’s the tutorial: https://www.wpblog.com/update-php-version-in-xampp/.